Add Remove Multiple Input Fields Dynamically Using jQuery with Example
09 May 2022 | jQuery
In this tutorial, you will learn how to Add Remove multiple Input fields Dynamically using jQuery with example. Many times, we need multiple input fields in a form to fetch multiple items, for example, multiple mobile numbers, multiple email ids, etc., so we require multiple fields.
Therefore, we can easily add or remove multiple input fields using jQuery.
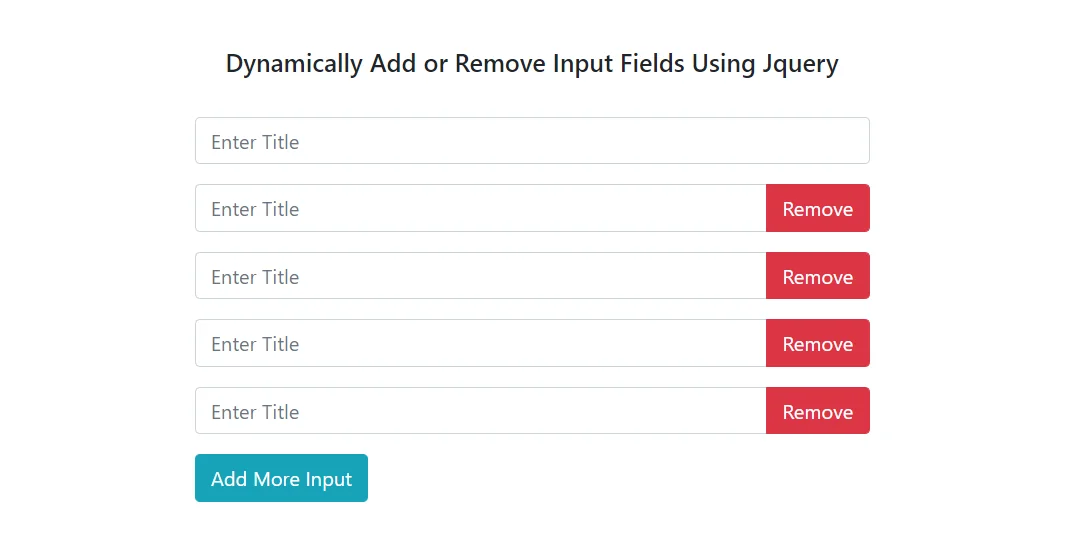
In the following example, you'll see how to dynamically add or remove multiple input fields using Bootstrap 4 and jQuery. You can simply add more input fields by clicking the "add more input" button and remove any input field by clicking the Remove button displayed in front of the input field.
Preview:

Step 1: Create HTML File
First, we need to create an HTML file and add bootstrap CSS and JS links, then create a form like this.
index.html
<!doctype html>
<html lang="en">
  <head>
    <!-- Required meta tags -->
    <meta charset="utf-8">
    <meta name="viewport" content="width=device-width, initial-scale=1, shrink-to-fit=no">

    <!-- Bootstrap CSS -->
    <link rel="stylesheet" href="https://cdn.jsdelivr.net/npm/[email protected]/dist/css/bootstrap.min.css" integrity="sha384-Gn5384xqQ1aoWXA+058RXPxPg6fy4IWvTNh0E263XmFcJlSAwiGgFAW/dAiS6JXm" crossorigin="anonymous">

    <title>Dynamically Add Or Remove Inputs</title>
  </head>
  <body>

<div class="container mt-5">
  <div class="row">

    <div class="col-md-12 mb-4 text-center">
      <h5>Dynamically Add or Remove Input Fields Using Jquery</h5>
    </div>

    <div class="col-md-3"></div>

    <div class="col-md-6">
	    	<form>
	    		<div class="mb-3 input-group repeatDiv" id="repeatDiv">
	    			<input type="text" class="form-control" name="mobile[]" placeholder="Enter Title">
	    		</div>

	    		<button type="button" class="btn btn-info" id="repeatDivBtn" data-increment="1">Add More Input</button>
	    	</form>
    </div>

    <div class="col-md-3"></div>
  </div>
</div>

    <!-- Optional JavaScript -->
    <!-- jQuery first, then Popper.js, then Bootstrap JS -->
    <script src="https://code.jquery.com/jquery-3.2.1.slim.min.js" integrity="sha384-KJ3o2DKtIkvYIK3UENzmM7KCkRr/rE9/Qpg6aAZGJwFDMVNA/GpGFF93hXpG5KkN" crossorigin="anonymous"></script>
    <script src="https://cdn.jsdelivr.net/npm/[email protected]/dist/umd/popper.min.js" integrity="sha384-ApNbgh9B+Y1QKtv3Rn7W3mgPxhU9K/ScQsAP7hUibX39j7fakFPskvXusvfa0b4Q" crossorigin="anonymous"></script>
    <script src="https://cdn.jsdelivr.net/npm/[email protected]/dist/js/bootstrap.min.js" integrity="sha384-JZR6Spejh4U02d8jOt6vLEHfe/JQGiRRSQQxSfFWpi1MquVdAyjUar5+76PVCmYl" crossorigin="anonymous"></script>

	<script src="https://ajax.googleapis.com/ajax/libs/jquery/3.5.1/jquery.min.js"></script>
    <script type="text/javascript" src="script.js"></script>

  </body>
</html>
Step 2: Create JavaScript File
In this step, we need to create a JavaScript file to write jQuery code to dynamically add or remove multiple input fields.
script.js
$(document).ready(function () {

	$("#repeatDivBtn").click(function () {

		$newid = $(this).data("increment");
		$repeatDiv = $("#repeatDiv").wrap('<div/>').parent().html();
		$('#repeatDiv').unwrap();
		$($repeatDiv).insertAfter($(".repeatDiv").last());
		$(".repeatDiv").last().attr('id',   "repeatDiv" + '_' + $newid);
		$("#repeatDiv" + '_' + $newid).append('<div class="input-group-append"><button type="button" class="btn btn-danger removeDivBtn" data-id="repeatDiv'+'_'+ $newid+'">Remove</button></div>');
		$newid++;
		$(this).data("increment", $newid);

	});


	$(document).on('click', '.removeDivBtn', function () {

		$divId = $(this).data("id");
		$("#"+$divId).remove();
		$inc = $("#repeatDivBtn").data("increment");
		$("#repeatDivBtn").data("increment", $inc-1);

	});

});
Now the above code is ready to run.
Buddy! I hope you relished the tutorial, and it was good to see you again. Keep learning. Keep visiting.


