How to create crud application in laravel 9 from scratch
calendar_month 08 Jan 2023 | Laravel
In this tutorial, you will learn how to create crud application in Laravel 9 from scratch. I am going to show you an example of how Laravel 9 Crud operation step by step from scratch.
Laravel 9 is the latest version of Laravel and it is released with several updates, so if you are new to Laravel or don't know how to create an insert update delete application in Laravel 9, just follow these simple steps.
In this example, we'll create a blog crud application from scratch using Laravel 9. We'll create a posts table using the Laravel 9 migration, then create the resource controller, model, routes, and view files.
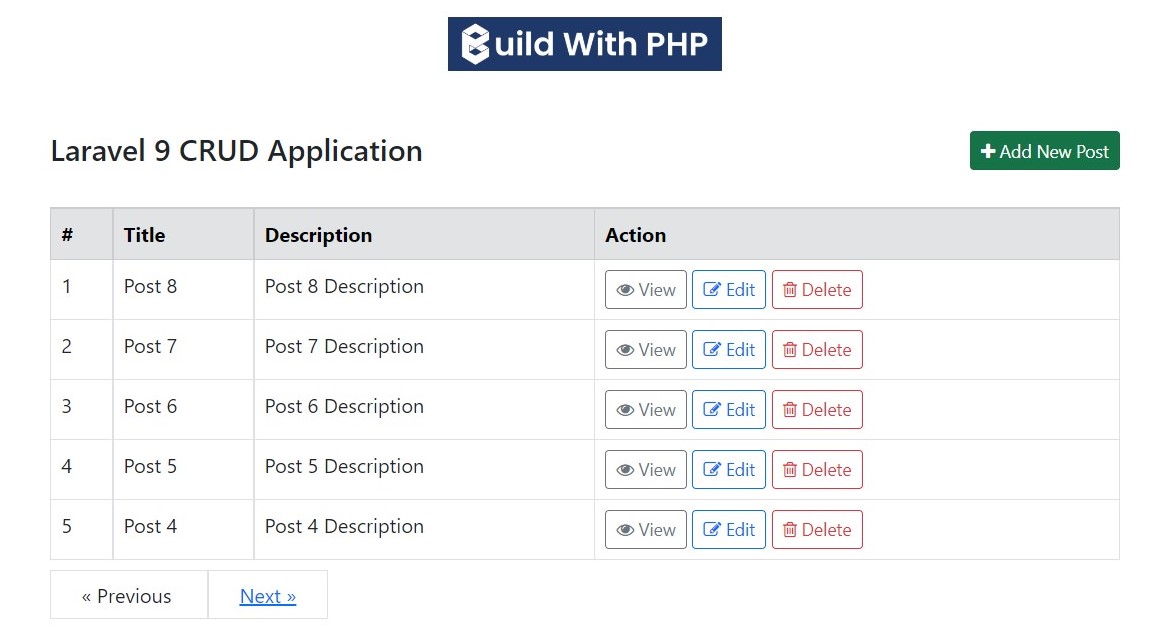
To get a Laravel 9 crud application like the one below, just follow these simple steps.
Preview:

Step 1: Install Laravel 9
Let's start the tutorial by installing a new Laravel 9 application. So, open the command prompts, then paste and run the following command to install Laravel 9 on your system. If you have already created the Laravel project, skip this step.
composer create-project laravel/laravel blog
Step 2: Database Configuration
In this step, we need to connect our Laravel 9 crud application to a database. So, let's open the .env file and make the following changes in this file to configure the database connection.
.env
DB_CONNECTION=mysql
DB_HOST=127.0.0.1
DB_PORT=3306
DB_DATABASE=blog
DB_USERNAME=root
DB_PASSWORD=
Step 3: Create Controller, Model, and Migration File
Now with the help of the following command, we will create the resource controller, model, and migration file.
php artisan make:model Post -mcr
This command will create the following files.
| File: | Path: |
|---|---|
| Controller File | app/Http/Controllers/ PostController.php |
| Model File | app/ Models/ Post.php |
| Migration File | database/ migrations/timestamp_create_posts_table .php |
In PostController.php you will find the following default methods.
| Methods: | |
|---|---|
| 1. | index() |
| 2. | create() |
| 3. | store() |
| 4. | show() |
| 5. | edit() |
| 6. | update() |
| 7. | destroy() |
Now you need to open the controller file and make the following changes.
app/Http/Controllers/PostController.php
<?php

namespace App\Http\Controllers;

use App\Models\Post;
use Illuminate\Http\Request;

class PostController extends Controller
{
    /**
     * Display a listing of the resource.
     *
     * @return \Illuminate\Http\Response
     */
    public function index()
    {
        $posts = Post::latest()->simplePaginate(5);
        return view('posts.index', compact('posts'))
        ->with('i', (request()->input('page', 1) - 1) * 5);
    }

    /**
     * Show the form for creating a new resource.
     *
     * @return \Illuminate\Http\Response
     */
    public function create()
    {
        return view('posts.create');
    }

    /**
     * Store a newly created resource in storage.
     *
     * @param  \Illuminate\Http\Request  $request
     * @return \Illuminate\Http\Response
     */
    public function store(Request $request)
    {
        Post::create($request->all());
        return redirect('posts')
                            ->with('success','Record Created successfully.');
    }

    /**
     * Display the specified resource.
     *
     * @param  \App\Models\Post  $post
     * @return \Illuminate\Http\Response
     */
    public function show(Post $post)
    {
        return view('posts.show',compact('post'));
    }

    /**
     * Show the form for editing the specified resource.
     *
     * @param  \App\Models\Post  $post
     * @return \Illuminate\Http\Response
     */
    public function edit(Post $post)
    {
        return view('posts.edit',compact('post'));
    }

    /**
     * Update the specified resource in storage.
     *
     * @param  \Illuminate\Http\Request  $request
     * @param  \App\Models\Post  $post
     * @return \Illuminate\Http\Response
     */
    public function update(Request $request, Post $post)
    {
        $post->update($request->all());
        return redirect('posts')
                            ->with('success','Record updated successfully.');
    }

    /**
     * Remove the specified resource from storage.
     *
     * @param  \App\Models\Post  $post
     * @return \Illuminate\Http\Response
     */
    public function destroy(Post $post)
    {
        $post->delete();
        return redirect('posts')
                            ->with('success','Record deleted successfully.');
    }
}
Then open the Model file and paste the following code in the post.php file.
app/Models/Post.php
<?php

namespace App\Models;

use Illuminate\Database\Eloquent\Factories\HasFactory;
use Illuminate\Database\Eloquent\Model;

class Post extends Model
{
    use HasFactory;

    protected $fillable = [
        'title', 'description'
    ];
}
Step 4: Migrate Database
In this step, you need to open the migration file and make the following changes to create the posts table.
<?php

use Illuminate\Database\Migrations\Migration;
use Illuminate\Database\Schema\Blueprint;
use Illuminate\Support\Facades\Schema;

class CreatePostsTable extends Migration
{
    /**
     * Run the migrations.
     *
     * @return void
     */
    public function up()
    {
        Schema::create('posts', function (Blueprint $table) {
            $table->id();
            $table->string('title');
            $table->longText('description');
            $table->timestamps();
        });
    }

    /**
     * Reverse the migrations.
     *
     * @return void
     */
    public function down()
    {
        Schema::dropIfExists('posts');
    }
}
Now you need to run this migration with the following command to create tables in the database.
php artisan migrate
Step 5: Add Resource Route
Here we need to add the resource route for the post controller, so open the route file and add the following resource route.
routes/web.php
<?php

use Illuminate\Support\Facades\Route;
use App\Http\Controllers\PostController;

/*
|--------------------------------------------------------------------------
| Web Routes
|--------------------------------------------------------------------------
|
| Here is where you can register web routes for your application. These
| routes are loaded by the RouteServiceProvider within a group which
| contains the "web" middleware group. Now create something great!
|
*/

Route::get('/', function () {
    return view('welcome');
});

Route::resource('posts', PostController::class);
Step 6: Add Blade Files
In this last step, we only need to create blade layout and view files for Laravel 9 crud application. So let's create the following files and paste the following code into these files.
resources/views/layout/web-layout.blade.php
<!doctype html>
<html lang="en">
  <head>
    <!-- Required meta tags -->
    <meta charset="utf-8">
    <meta name="viewport" content="width=device-width, initial-scale=1">

    <!-- Bootstrap CSS -->
    <link href="https://cdn.jsdelivr.net/npm/[email protected]/dist/css/bootstrap.min.css" rel="stylesheet" integrity="sha384-EVSTQN3/azprG1Anm3QDgpJLIm9Nao0Yz1ztcQTwFspd3yD65VohhpuuCOmLASjC" crossorigin="anonymous">

    <link rel="stylesheet" href="https://cdnjs.cloudflare.com/ajax/libs/font-awesome/4.7.0/css/font-awesome.min.css">

    <title>Laravel 9 CRUD Application - buildwithphp.com</title>
  </head>
  <body>

    <div class="container">
    	@yield('content')
    </div>


    <script src="https://cdn.jsdelivr.net/npm/[email protected]/dist/js/bootstrap.bundle.min.js" integrity="sha384-MrcW6ZMFYlzcLA8Nl+NtUVF0sA7MsXsP1UyJoMp4YLEuNSfAP+JcXn/tWtIaxVXM" crossorigin="anonymous"></script>
  </body>
</html>
resources/views/posts/index.blade
@extends('layout.web-layout')

@section('content')

<div class="row my-4">
	<div class="col-lg-2 mx-auto p-1" style="background-color: #1f386a;">
	  	<a href="https://www.buildwithphp.com/">
	  		<img src="https://www.buildwithphp.com/front/images/logo.webp" class="img-fluid">
	  	</a>
	</div>
</div>

<div class="row">
	<div class="col-lg-2"></div>
	<div class="col-lg-8 my-4">
		<div class="float-start">
			<h4>Laravel 9 CRUD Application</h4>
		</div>
		<div class="float-end">
			<a class="btn btn-sm btn-success" href="{{ route('posts.create') }}"><i class="fa fa-plus"></i> Add New Post</a>
		</div>
	</div>
	<div class="col-lg-2"></div>
</div>

<div class="row">
	<div class="col-lg-2"></div>
	<div class="col-lg-8">
         @if ($message = Session::get('success'))
         <div class="alert alert-success">
         	{{ $message }}
         </div>
         @endif
		<table class="table table-bordered table-hover">
			<thead>
				<tr class="table-secondary">
					<th>#</th>
					<th>Title</th>
					<th>Description</th>
					<th>Action</th>
				</tr>
			</thead>
			<tbody>
				@foreach ($posts as $post)
				<tr>
					<td>{{ ++$i }}</td>
					<td>{{ $post->title }}</td>
					<td>{{ $post->description }}</td>
					<td>
						<a class="btn btn-sm btn-outline-secondary" href="{{ route('posts.show',$post->id) }}">
							<i class="fa fa-eye"></i> View
						</a>
						<a class="btn btn-sm btn-outline-primary" href="{{ route('posts.edit',$post->id) }}">
							<i class="fa fa-pencil-square-o"></i> Edit
						</a>
						<form method="post" action="{{ route('posts.destroy',$post->id) }}" class="d-inline">
							@csrf
							@method('DELETE')
							<button type="submit" class="btn btn-sm btn-outline-danger" onclick="return confirm('are you sure do you want to delete this record')">
								<i class="fa fa-trash-o"></i> Delete
							</button>
						</form>
					</td>
				</tr>
				@endforeach
			</tbody>
		</table>

		{!! $posts->links() !!}

	</div>
	<div class="col-lg-2"></div>
</div>

@endsection
resources/views/posts/create.blade
@extends('layout.web-layout')

@section('content')

<div class="row my-4">
	<div class="col-lg-2 mx-auto p-1" style="background-color: #1f386a;">
	  	<a href="https://www.buildwithphp.com/">
	  		<img src="https://www.buildwithphp.com/front/images/logo.webp" class="img-fluid">
	  	</a>
	</div>
</div>

<div class="row">
	<div class="col-lg-2"></div>
	<div class="col-lg-8 my-4">
		<div class="float-start">
			<h4>Add New Post</h4>
		</div>
		<div class="float-end">
			<a class="btn btn-sm btn-warning" href="{{ route('posts.index') }}"><i class="fa fa-chevron-left"></i> Back</a>
		</div>
	</div>
	<div class="col-lg-2"></div>
</div>

<div class="row">
	<div class="col-lg-2"></div>
	<div class="col-lg-8">
		<form method="post" action="{{ route('posts.store') }}">
			@csrf
			<div class="mb-3">
				<label class="form-label fw-bold">Title</label>
				<input type="text" class="form-control" placeholder="Enter Title" name="title" required>
			</div>
			<div class="mb-3">
				<label class="form-label fw-bold">Description</label>
				<textarea class="form-control" placeholder="Description..." name="description" required></textarea>
			</div>
			<div class="mb-3">
				<button type="Save" class="btn btn-sm btn-success">
					<i class="fa fa-floppy-o"></i> Submit
				</button>
			</div>
		</form>
	</div>
	<div class="col-lg-2"></div>
</div>

@endsection
resources/views/posts/edit.blade
@extends('layout.web-layout')

@section('content')

<div class="row my-4">
	<div class="col-lg-2 mx-auto p-1" style="background-color: #1f386a;">
	  	<a href="https://www.buildwithphp.com/">
	  		<img src="https://www.buildwithphp.com/front/images/logo.webp" class="img-fluid">
	  	</a>
	</div>
</div>

<div class="row">
	<div class="col-lg-2"></div>
	<div class="col-lg-8 my-4">
		<div class="float-start">
			<h4>Edit Post</h4>
		</div>
		<div class="float-end">
			<a class="btn btn-sm btn-warning" href="{{ route('posts.index') }}"><i class="fa fa-chevron-left"></i> Back</a>
		</div>
	</div>
	<div class="col-lg-2"></div>
</div>

<div class="row">
	<div class="col-lg-2"></div>
	<div class="col-lg-8">
		<form method="post" action="{{ route('posts.update', $post->id) }}">
			@csrf
			@method('PUT')
			<div class="mb-3">
				<label class="form-label fw-bold">Title</label>
				<input type="text" class="form-control" placeholder="Enter Title" name="title" value="{{ $post->title }}" required>
			</div>
			<div class="mb-3">
				<label class="form-label fw-bold">Description</label>
				<textarea class="form-control" placeholder="Description..." name="description" required>{{ $post->description }}</textarea>
			</div>
			<div class="mb-3">
				<button type="Save" class="btn btn-sm btn-success">
					<i class="fa fa-floppy-o"></i> Submit
				</button>
			</div>
		</form>
	</div>
	<div class="col-lg-2"></div>
</div>

@endsection
resources/views/posts/show.blade
@extends('layout.web-layout')

@section('content')

<div class="row my-4">
	<div class="col-lg-2 mx-auto p-1" style="background-color: #1f386a;">
	  	<a href="https://www.buildwithphp.com/">
	  		<img src="https://www.buildwithphp.com/front/images/logo.webp" class="img-fluid">
	  	</a>
	</div>
</div>

<div class="row">
	<div class="col-lg-2"></div>
	<div class="col-lg-8 my-4">
		<div class="float-start">
			<h4>View Post</h4>
		</div>
		<div class="float-end">
			<a class="btn btn-sm btn-warning" href="{{ route('posts.index') }}"><i class="fa fa-chevron-left"></i> Back</a>
		</div>
	</div>
	<div class="col-lg-2"></div>
</div>

<div class="row">
	<div class="col-lg-2"></div>
	<div class="col-lg-8">

			<div class="mb-3">
				<h6>Title:</h6>
				<p>{{ $post->title }}</p>
			</div>

			<div class="mb-3">
				<h6>Description:</h6>
				<p>{{ $post->description }}</p>
			</div>

	</div>
	<div class="col-lg-2"></div>
</div>

@endsection
Run Laravel 9 CRUD Application
If you have done all the necessary steps, now you need to type the following command in the command prompt and press enter to run the Laravel 9 Crud application.
php artisan serve
Congrats mate, your Laravel 9 crud application is ready to run. So, you can access this by opening the following URL in your web browser.
http://localhost:8000/posts

Ashwani Kumar
I'm a dedicated full-stack developer, entrepreneur, and proud owner of buildwithphp.com. I reside in India, where I draw inspiration to create helpful tutorials and tips for fellow artisans. I'm deeply passionate about technologies like Bootstrap, PHP, CodeIgniter, Laravel, Node, React, JavaScript, and jQuery. I believe in working hard consistently, which keeps me motivated and driven. Challenges are opportunities to learn, setbacks are lessons. I find inspiration in the endless potential of technology and aim to make a meaningful impact with my work.
Buddy! I hope you relished the tutorial, and it was good to see you again. Keep learning. Keep visiting.

